
I recently sat down (over Zoom) with our UX lead Annika Oeser, who walked me through a typical UX workshop like the ones we usually conduct with our agency clients.
The UX workshop is one of the key activities of the discovery phase in any project. Typical activities include user journey mapping and card sorting, the latter of which is best suited to projects that involve content strategy and information architecture.
“At the end of a discovery, the team should come together, agree on the top things it found out, and use this knowledge to frame design challenges.” (NN Group)
Put simply, says Annika, the goal of these activities is to “create a shared vision for the entire team”.
Here’s how our team plans and executes user experience workshops that deliver real value to the project.
Before the workshop
The first step we typically take when preparing for a UX workshop is to send out a stakeholder questionnaire to the client, which is usually filled out in advance. This provides us with a foundation for the rest of our workshop plan.
Who we send these questionnaires to depends on the nature of the project, but it’s always a good idea to gather a variety of perspectives. We usually send them to the people who we want to participate in the workshop.
For example, we might want to collect information from:
- Decision-makers
- People who work with users
- If we’re lucky, actual users
Depending on the amount of time we’ll have for the workshop itself, we’ll sometimes come up with part of the next steps (personas and scenarios) ourselves and have them validated by the client before we start. Ideally though, we’ll come up with those things during the workshop.
During the workshop
Almost all of our UX workshops consist of personas, user journey mapping, and sometimes card sorting. Since everything has gone virtual, we’ve been using Miro boards to facilitate our workshops.
When there’s an existing website, we usually uncover current pain points of the users and identify opportunities to improve their experience with the website.
If it is a new website, we create user scenarios together to make sure that we build a website with functionalities and flows that help the users accomplish their goals easily.
We’ll look at the entire experience from the perspective of the client’s primary audiences, always taking their objectives as an organization into account.
Who does what?
Typically, UX lead Annika and co-founder/technical lead Suzanne facilitate workshops together. When time allows, our designer Shane will also participate - it’s good to have a professional in the group to help come up with ideas.
The secret to smooth sailing in virtual workshops? Splitting up the participants into breakout sessions. Having more than five or six people on a single board makes it hard for everyone to have an equal voice. Another tip that works great for our team is to divide the groups according to seniority (e.g. junior employees and managers). This helps ease some participants’ anxieties and allows everyone to speak up and comfortably share their ideas.
“If we can get an actual user in each of the groups, that’s always ideal,” Annika told me. Because typical projects are on a tight schedule, it’s not always easy for companies to recruit real users in time for the workshop. “The solution is to think about it as early as possible and start a network of users you can reach out to,” she suggests.
“We try to keep our workshops, especially virtual ones, down to 5-10 participants; otherwise, it can get chaotic. Once, we forgot to tell the client and we had 25 people. I was freaking out a bit, but it actually went well because people were respectful.”
On the topic of introductions and icebreakers, Annika told me that we’ll often skip formal introductions because of time constraints. Plus, she says, virtual settings just don’t feel as conducive to the traditional “everyone says their name and a bit about themself”. For in-person workshops, we try to start each session with an icebreaker activity. Again, this works better in person.
Activity: Persona creation/validation
“Personas don’t necessarily have to be fully fleshed out and detailed,” says Annika. The important things to have in mind are each persona’s basic characteristics, and information about their questions, concerns, needs, desires and jobs to be done in relation to the journey at hand.
If we have the time, we’ll create personas during the workshop, but in practice we typically collect this information beforehand and have the client validate the resulting proto-personas and scenarios before we start.
Activity: User journey mapping
Next, we want to map out the different steps our personas might take in order to reach their desired outcome. When we do journey mapping we want to learn as much as possible about the website’s audiences and their user journeys so that we can design and build a website that truly helps them achieve their goals. Using Miro, for each persona we’ll fill in cards with what we believe are different steps for our persona to meet their goals: interactions, questions/thoughts, opportunities, and notes.
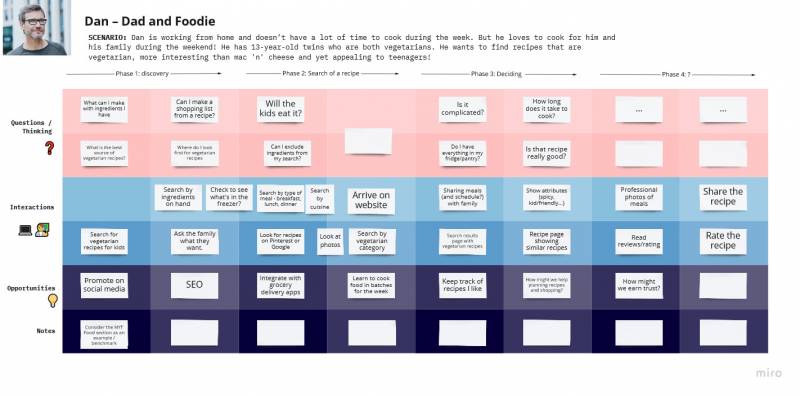
For the notes section, we like to use How-might-we questions, which enable us to think about the different ways to tailor the experience to each step of our persona’s journey.
NN Group has a great article that goes in depth on the concept of How-might-we questions. “To prevent individuals from suggesting their pet solutions, which might have little resemblance to the problems found, construct How-might-we questions that frame the problem(s) for ideation.” Read more here.
What about card sorting?
Card sorting is more complicated because people think of it as a sitemap, but what we’re trying to do is organize content to determine what kind of functionality we have/need. If your project requires card sorting, it’s important to be extremely explicit about the goal of the exercise.
After the workshop
The main steps our team takes once the workshop is over are:
- Regroup and discuss findings.
- Create a strategy document where we list top priorities and design opportunities.
- Explain the redesign.
Next, we’ll get to work on the wireframes and sketches!