
Are you a Drupal enthusiast looking to take your theming game to the next level? Well, you're in for a treat! In this blog post, we're going to dive into some essential best practices for Drupal theming.
View Modes
❌Don’t use the same view mode for everything
✅Do use view modes for unique content displays
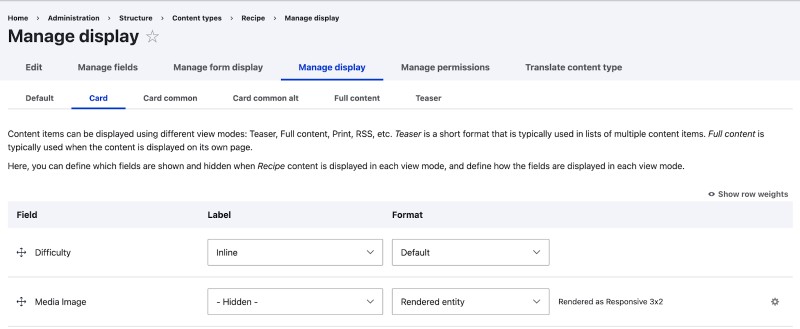
View modes are an invaluable tool when it comes to theming in Drupal. They allow you to create unique presentations for your content, tailored to specific use cases. Here's why you should embrace them:
Tailored content display. View modes allow you to customize how your content appears in different contexts. You can make each one look just right, whether it's a teaser on a list page or a full content view.
Field management and formatting. Tired of displaying all the fields, even when you only need a few? View modes let you selectively show or hide specific fields, ensuring a clutter-free design. What’s more, view modes enable you to apply different formatters to each field.
Control referenced entities. View modes are also incredibly useful when displaying referenced entities as you can customize how a referenced entity appears per view mode.
Custom templates. Having different view modes also allows you to create specific templates that you can easily override and customize to your liking.
Some common examples of custom view modes:
- Search result – used when the content is displayed as part of a search result
- Featured – used when displaying the content in a more prominent way
- Embedded – used when embedding the content inside a rich-text editor
Printing Field Values
❌Don’t access entity fields directly
✅Do use the content object when printing field values
Accessing and printing out entity fields directly places the burden of displaying fields on you and your code further increasing technical debt. So avoid printing entity fields like this:
<div>
  {{node.field_example.value}}
</div>
Instead, use the content object:
<div>
  {{content.field_example}}
</div>
Using the content object means you'll benefit from field widgets and formatters. There are tons of contrib modules that provide additional field widgets and formatters that you can use.
The content object also allows you to take advantage of field preprocess functions as well as field templates. These are out-of-the-box theming helpers that allow you to fine-tune the appearance of your fields. This approach is very close to Drupal standards.
However, there's an exception to this rule. You may access entity fields directly when checking raw values (like lists or keys) or when you need to verify the truthiness of a field. In these specific cases, it's acceptable to access the fields directly from the entity object instead of the content object. See the sections on empty fields and ternary operations below for tips on how to check raw values.
Beyond Content Fields
❌Don’t overfocus on fields and forget the rest of your content
✅Do pay attention to internal data and use the without Twig filter
It’s normal to find yourself printing the content fields individually, but it’s essential not to overlook the rest of your content. Here’s what to keep in mind:
Ensure processing of important internal data. Your content may contain essential internal data, such as hidden form tokens or cache tags.
Customize your view mode to hide fields. One of the strengths of view modes is their ability to hide specific fields. By leveraging view modes effectively, you can ensure that certain fields are hidden when they are not needed in a particular context.
Use the without Twig filter. To print the rest of the content effortlessly, you can make use of the without Twig filter. This filter allows you to exclude specific fields from the rendering, ensuring that only the necessary content is displayed.
// Print content fields individually.
{{content.field_foo}}
{{content.field_bar}}

// But don't forget to "flush" the rest of the content.
{{content|without('field_foo','field_bar')}}
Clean, Lean Templates
❌Don’t allow clutter and "Drupalisms" to build up
✅Do use contrib modules to tidy up your code
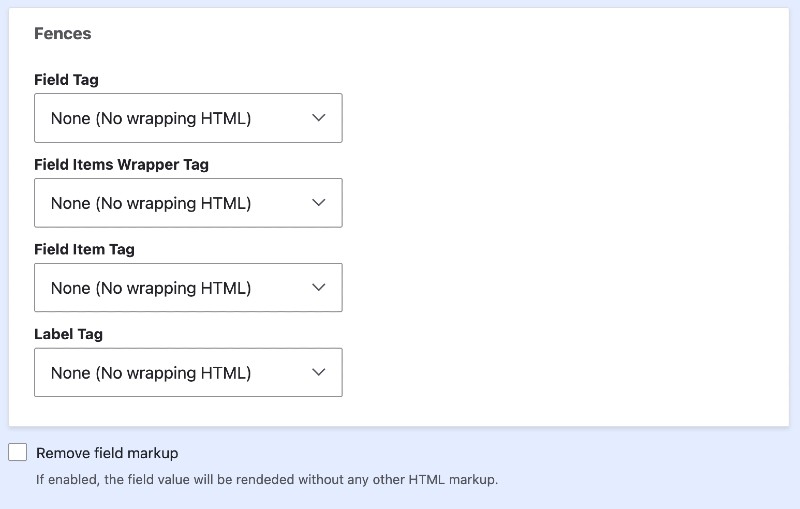
The Fences and No Markup modules can help you achieve more concise and readable code for cleaner, more efficient templates.
These modules allow you to control the HTML markup and structure of your content without creating unnecessary clutter. Your templates will be easier to maintain and understand as a result.
They also allow for more standardized markup that’s easier to style with CSS. Drupal generates a lot of markup by default, often containing "Drupalisms"—patterns and classes that are specific to the Drupal ecosystem. Fences and No Markup enable you to strip away these Drupal-specific elements.
Empty Fields
❌Don’t rely on rendering functions to tell you if a field is empty
✅Do check the entity property directly
One area that often goes overlooked is handling empty fields. It’s best practice to check the entity property directly instead of relying on rendering functions to determine if a field is empty. By accessing the raw data, you can efficiently assess whether the field contains content without triggering unnecessary rendering processes.
If you have to render a field before checking if it's empty, do so judiciously. Render the field once and store the result. Then perform your checks on the stored value. This approach minimizes the performance impact associated with repeated rendering calls.
Consider the following example:
{% if content.field_name | render is not empty %}
  {{content.field_name}}
{% endif %}
This can be optimized as follows:
{% if content.field_example is not empty %}

{% if node.field_example.value %}

{% if not node.field_example.isEmpty() %}
Or, if rendering is necessary, do it once and test:
{% set rendered_field = content.field_example|render|trim %}

{% if rendered_field %}
  {{rendered_field}}
{% endif %}
Ternary Operations
✅Do use ternary operations to make your code look concise
❌Don’t use them in situations where they might compromise code readability
Simplicity often leads to elegance. One way to achieve a cleaner and more concise codebase is by embracing Twig ternary operations. Here are some practical examples:
Example A: If foo, echo “yes” else echo “no”:
{{foo ? 'yes' : 'no'}}Example B: If foo, echo it, else echo “no”:
{{foo ?: 'no'}}or
{{foo ? foo : 'no'}}Example C: If foo, echo “yes”, else echo nothing:
{{ foo ? 'yes' }}or
{{foo ? 'yes' : ''}}Example D: If foo is defined and not null, echo it, “no” otherwise:
{{foo ?? 'no'}}Example E: If foo is defined (empty values also count), echo it, “no” otherwise:
{{foo | default('no')}}While Twig ternary operations are excellent for simplifying straightforward conditions, it's essential to use them judiciously. Reserve their use for situations where the conditions are concise and don't compromise code readability.
Twig Features
❌Don’t allow regular PHP code to become bloated and unwieldy
✅Do use Twig to create efficient and maintainable templates
Twig compiles templates down to plain optimized PHP code. Maximizing the potential of Twig goes a long way in creating efficient and maintainable templates. With single directory components (SDCs) becoming part of Drupal core, familiarizing yourself with Twig, and its built-in functions, is now more practical than ever.
Include: Insert Static Template Content
The include statement allows you to insert static template content from another file into your current template. This can be especially handy when you have reusable components or snippets of code that you want to include across multiple templates.
For example:
{# Include header content from a separate template file #}

{% include 'themes/my_theme/templates/header.html.twig' %}
Extends: Template Inheritance
The extends statement is the foundation of template inheritance. It enables you to create a base template with common elements and then extend or override specific sections in child templates. This promotes consistency and reduces redundancy in your theming. Some examples are below.
Base template: base.html.twig
<div class="container mx-auto">
  <header class="my-2">
    <h1 class="text-2xl">
      {%block header%}{%endblock%}
    </h1>
  </header>
  <main>
    {%block content%}{%endblock%}
  </main>
</div>
Child template: child.html.twig:
{% extends 'base.html.twig' %}

{% block header %}
  Extended block
{% endblock %}

{% block content %}
  <p class="mb-4">
    This block is <code class="font-semibold">extended</code>.
  </p>
{% endblock %}
Use: Import Blocks Without Inheriting Structure
The use statement allows you to import blocks from another template without inheriting its entire structure. This can be useful when you want to reuse specific blocks without committing to the entire template. Example:
Block library: block-library.html.twig
{% block header %}
<header>
<nav>
<div>
<a href="#">Product</a>
<a href="#">Features</a>
<a href="#">Marketplace</a>
<a href="#">Company</a>
</div>
</nav>
</header>
{% endblock %}
{% block footer %}
<footer>
<p>Copyright © My Website 2023. All rights reserved.</p>
</footer>
{% endblock %}
{% block sidebar %}
<aside>
This is a sidebar
</aside>
{% endblock %}Section: section.html.twig
{% use 'block-library.html.twig' %}
<div>
  {{ block('header') }}
</div>
Embed: Create Reusable Self-Contained Components
The embed statement is similar to include but with a crucial difference. It allows you to create self-contained components that encapsulate their own logic and styling. This promotes modularity and makes your templates more maintainable. Some examples are below:
Person card: person-card.html.twig
{% block person %}
<div>
  <div>
    <a href="#">
      <p>
        {% block name %}Name{% endblock %}
      </p>
      <p>
        {% block position %}Position{% endblock %}
      </p>
    </a>
  </div>
</div>
{% endblock %}
People list: people.html.twig
<div>
  {% embed 'person-card.html.twig' %}
    {% block name %}
      Bubbles McFuzzball
    {% endblock %}
    {% block position %}
      Chief Bubbleologist
    {% endblock %}
  {% endembed %}
  {% embed 'person-card.html.twig' %}
    {% block name %}
      Sir Reginald Fluffernutter
    {% endblock %}
    {% block position %}
      Director of Snuggles
    {% endblock %}
  {% endembed %}
</div>
Macro: Create Reusable, Parameterized Code Chunks
The macro statement enables you to define reusable, parameterized code chunks. This is particularly useful when you need to repeat a specific operation with variations across your templates.
Button: button.html.twig
{% macro button(text,url,color='indigo') %}
<a href="{{url}}" class="inline-block rounded-md bg-{{color}}-600 py-2.5 px-3.5 text-sm font-semibold text-white shadow-sm hover:bg-{{color}}-500 focus-visible:outline focus-visible:outline-2 focus-visible:outline-offset-2 focus-visible:outline-{{color}}-600">
  {{text}}
</a>
{% endmacro %}
Form actions: form-actions.html.twig
{% import 'button.html.twig' as buttons %}
<div class="mb-2">
  {{ buttons.button('Primary Button','#','indigo') }}
</div>
<div>
  {{ buttons.button('Secondary Button','#','zinc') }}
</div>
The Final Word: Simplicity is Key
From the flexibility of view modes to the power of Twig features, each technique that I’ve covered in this article will contribute to cleaner, more maintainable templates. Just remember that simplicity is key—the goal is to strike a balance between conciseness and clarity.
Happy theming!